Automated test generation? Yes, please.
This post shows how to write business logic for your software/app with Markdown tables and auto-generate tests for Xcode with a command line tool called AcceptanceMark.
But first, some context. Your code may have some test coverage in the form of:
- Unit Tests
- Integration Tests
- Acceptance Tests
- UI Tests
Read here for a good overview of the differences between them.
Additionally, you may have a dedicated Q/A team, and you regularly run your app manually to verify its correctness.
While writing good tests is essential for building quality software, it’s also something that takes valuable time. I’ll show you how to get your code under test faster, so that you can spend your time on more important things!
Testing, the Xcode way
In Xcode you can write Unit Tests or UI Tests by subclassing XCTestCase.
Let’s suppose that your system under test (SUT) is a date formatter that needs to work correctly with a variety of possible languages / input dates. The test class may look like this:
class DateFormatterTests: XCTestCase {

  func testDate_LanguageFrench_IsLocalizedCorrectly {
    // Given
    // When
    // Then
  }
  func testDate_LanguageItalian_IsLocalizedCorrectly {
    // Given
    // When
    // Then
  }
  // And so on for other languages
}
In practice, you can get full test coverage in three steps:
- Generate all input combinations
- Pass each input to the SUT and retrieve the output
- Compare the output with the expected value
Since XCTestCase methods do not take parameters, you need write a separate test method for each input combination. Example:
func testDate_LanguageFrench_IsLocalizedCorrectly() {
  let output = localisedDateString(year: 2016, month: 9, day: 16, languageIdentifier: "fr")
  XCTAssertEqual(output, "16 sept. 2016")
}

// all other languages and dates tests here

func testDate_LanguageEnglish_IsLocalizedCorrectly() {
  let output = localisedDateString(year: 2016, month: 9, day: 16, languageIdentifier: "en")
  XCTAssertEqual(output, "Sep 16, 2016")
}
// helper method to reduce the amount of common code in each test
func localisedDateString(year: Int, month: Int, day: Int, languageIdentifier: String) {
  let locale = Locale(identifier: localeIdentifier)
  let date = makeDate(year: year, month: month, day: day)
  return dateFormatter.string(for: date, locale: locale)
}
Some observations:
- This quickly becomes unpractical as the number of possible inputs increases.
- All the inputs and expected values are scattered across test methods. This could be improved by encoding inputs and expected values in an array of structs, and have each test process one item in the array.
- All your business requirements are confined to your test classes, which are typically not accessible or easy to understand by your Q/A team or product managers.
Making things better
What if you could write all your inputs and expectations in a table like this:
| year | month | day | language | localized date |
|---|---|---|---|---|
| 2016 | 9 | 16 | french | 16 sept. 2016 |
| 2016 | 9 | 16 | english | Sep 16, 2016 |
And have this automatically translated into an Xcode test class?
Well, I have written a tool called AcceptanceMark that does exactly that.
Just run this on the terminal:
amtool -i DateFormattingSimple.md
And the tool will generate a Swift test file like this:
/*
 * File Auto-Generated by AcceptanceMark - DO NOT EDIT
 * input file: DateFormattingSimple.md
 * generated file: DateFormattingSimple_DateFormattingTests.swift
 *
 * -- Test Specification --
 *
 * ## Date Formatting
 * | year:Int | month:Int | day:Int | language    || localized date |
 * | -------- | --------- | ------- | -------- |---| -------------- |
 * | 2016     |         9 |      16 | fr          || 16 sept. 2016  |
 * | 2016     |         9 |      16 | en          || Sep 16, 2016   |
 */

//// Don't forget to create a test runner:
//
//class DateFormattingSimple_DateFormattingRunner: DateFormattingSimple_DateFormattingRunnable {
//
//	func run(input: DateFormattingSimple_DateFormattingInput) throws -> DateFormattingSimple_DateFormattingOutput {
//		return DateFormattingSimple_DateFormattingOutput(<#parameters#>)
//	}
//}

import XCTest

struct DateFormattingSimple_DateFormattingInput {
    let year: Int
    let month: Int
    let day: Int
    let language: String
}

struct DateFormattingSimple_DateFormattingOutput: Equatable {
    let localizeddate: String
}

protocol DateFormattingSimple_DateFormattingRunnable {
    func run(input: DateFormattingSimple_DateFormattingInput) throws -> DateFormattingSimple_DateFormattingOutput
}
class DateFormattingSimple_DateFormattingTests: XCTestCase {

    var testRunner: DateFormattingSimple_DateFormattingRunnable!

    override func setUp() {
        // MARK: Implement the DateFormattingSimple_DateFormattingRunner() class!
        testRunner = DateFormattingSimple_DateFormattingRunner()
    }

    func testDateFormatting_row1() {
        let input = DateFormattingSimple_DateFormattingInput(year: 2016, month: 9, day: 16, language: "fr")
        let expected = DateFormattingSimple_DateFormattingOutput(localizeddate: "16 sept. 2016")
        let result = try! testRunner.run(input: input)
        XCTAssertEqual(expected, result)
    }

    func testDateFormatting_row2() {
        let input = DateFormattingSimple_DateFormattingInput(year: 2016, month: 9, day: 16, language: "en")
        let expected = DateFormattingSimple_DateFormattingOutput(localizeddate: "Sep 16, 2016")
        let result = try! testRunner.run(input: input)
        XCTAssertEqual(expected, result)
    }
}

func == (lhs: DateFormattingSimple_DateFormattingOutput, rhs: DateFormattingSimple_DateFormattingOutput) -> Bool {
    return
        lhs.localizeddate == rhs.localizeddate
}NOTE: What this tool really does is generate the code to execute a test runner with all the inputs and compare the outputs with the expected values, for each row of the table. It is up to you to write the test runner code needed to pass the input to your SUT and return the output.
Advantages over writing tests manually 💯
- This is a huge time saver because you no longer have to write all the tests manually. You only write one test runner to exercise your SUT with a given input and return an output.
- Your business logic is written in Markdown, which can be easily edited by non-developers in your team, and it can also be exported to HTML or PDF.
- You can add type information to your test Markdown tables to easily support basic value types such as String, Bool, Int, Float, so that you don’t have to do basic string-to-number conversions in your test code.
Note that the test runner is the place to encode application-specific domain knowledge about how to configure and run your SUT.
Also, the test runner takes one strongly-typed input struct, returns one strongly-typed output struct and is completely stateless. This is by design, and it ensures that tests will have no side effects.
🚀 Sounds great! Show me how to use this! 🚀
Now that I’ve covered the core principles behind AcceptanceMark, I can introduce a more detailed example.
Let’s suppose that the SUT is a DateFormatter extension:
import Foundation

public extension DateFormatter {

    convenience init(locale: Locale, style: DateFormatter.Style) {
        self.init()
        self.locale = locale
        self.dateStyle = style
        self.timeStyle = style
    }

    func string(from components: DateComponents) -> String? {

        guard let date = Calendar.current.date(from: components) else {
            return nil
        }

        return string(from: date)
    }
}
This date formatter takes the following inputs as parameters:
- Date Components (year, month, day, hour, minute, seconds)
- Language, derived from a locale identifier
- Date Formatter Style
I’ll now show you how to add test coverage to this class with a step-by-step guide. Ready? Let’s go!
Step 1: Create a new DateFormatting.md file in Xcode and add it to your tests folder. This will contain all your test data:
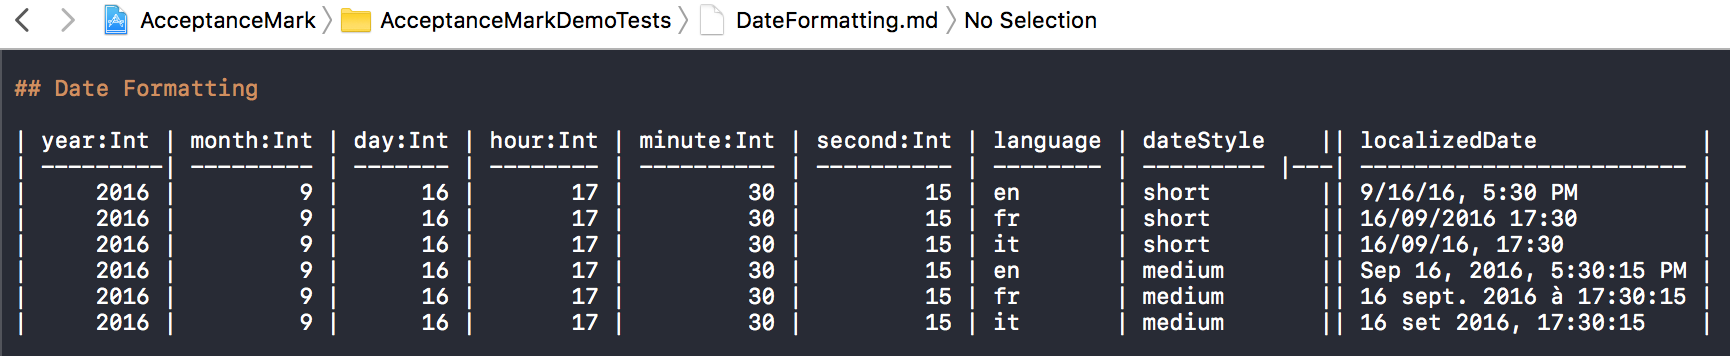
Some observations:
- The year, month, day, hour, minute, second columns are annotated as Int. AcceptanceMark does not support dates as a built-in type yet, but it’s ok to use separate components here so that the date input is format agnostic.
- The language column is a locale identifier string.
- The dateStyle column is a string.
- There is an empty column between dateStyle and localizedDate. This is called a separator column. AcceptanceMark treats all columns before it as inputs and all columns after it as outputs. A separator column is always required by AcceptanceMark. Also note that the second row of the table has three dashes (
---) for the empty column. This is because valid Markdown tables always have at least three dashes for each column. - The localizedDate column represents the only output of the table, which will be treated as an expected value in the tests.
- All column names use the camel case convention, in line with Swift naming conventions for variables.
Step 2: Generate a Swift test class from the Markdown file.
Prerequisite: for this to work, amtool needs to be installed on your machine. Please follow the instructions the AcceptanceMark GitHub page for how to compile and install amtool.
Open the terminal, cd to the test folder and run the following command:
amtool -i DateFormatting.md -l swift3
If everything goes well, the console output will confirm that a Swift file has been exported:
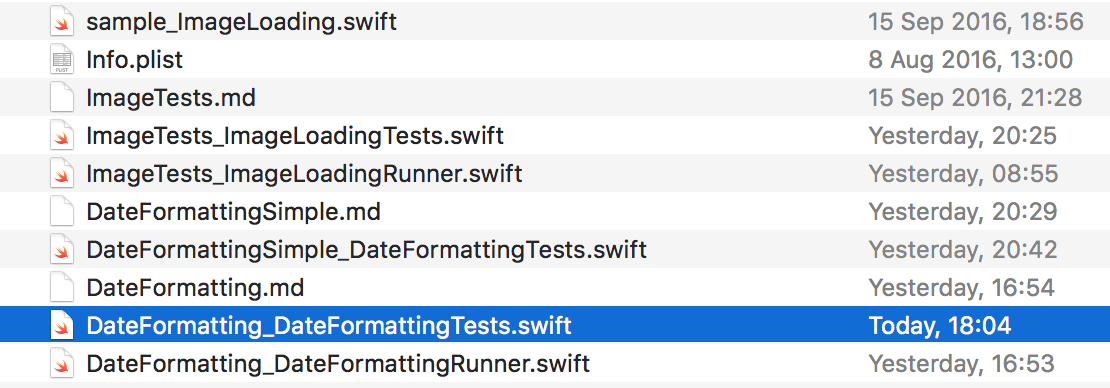
Exported swift3 code: /Users/andrea/AcceptanceMark/AcceptanceMarkDemoTests/DateFormatting_DateFormattingTests.swift
Open the folder and see that the file of interest is in there:
Step 3: Drag & drop this file to Xcode and add it to your test target:
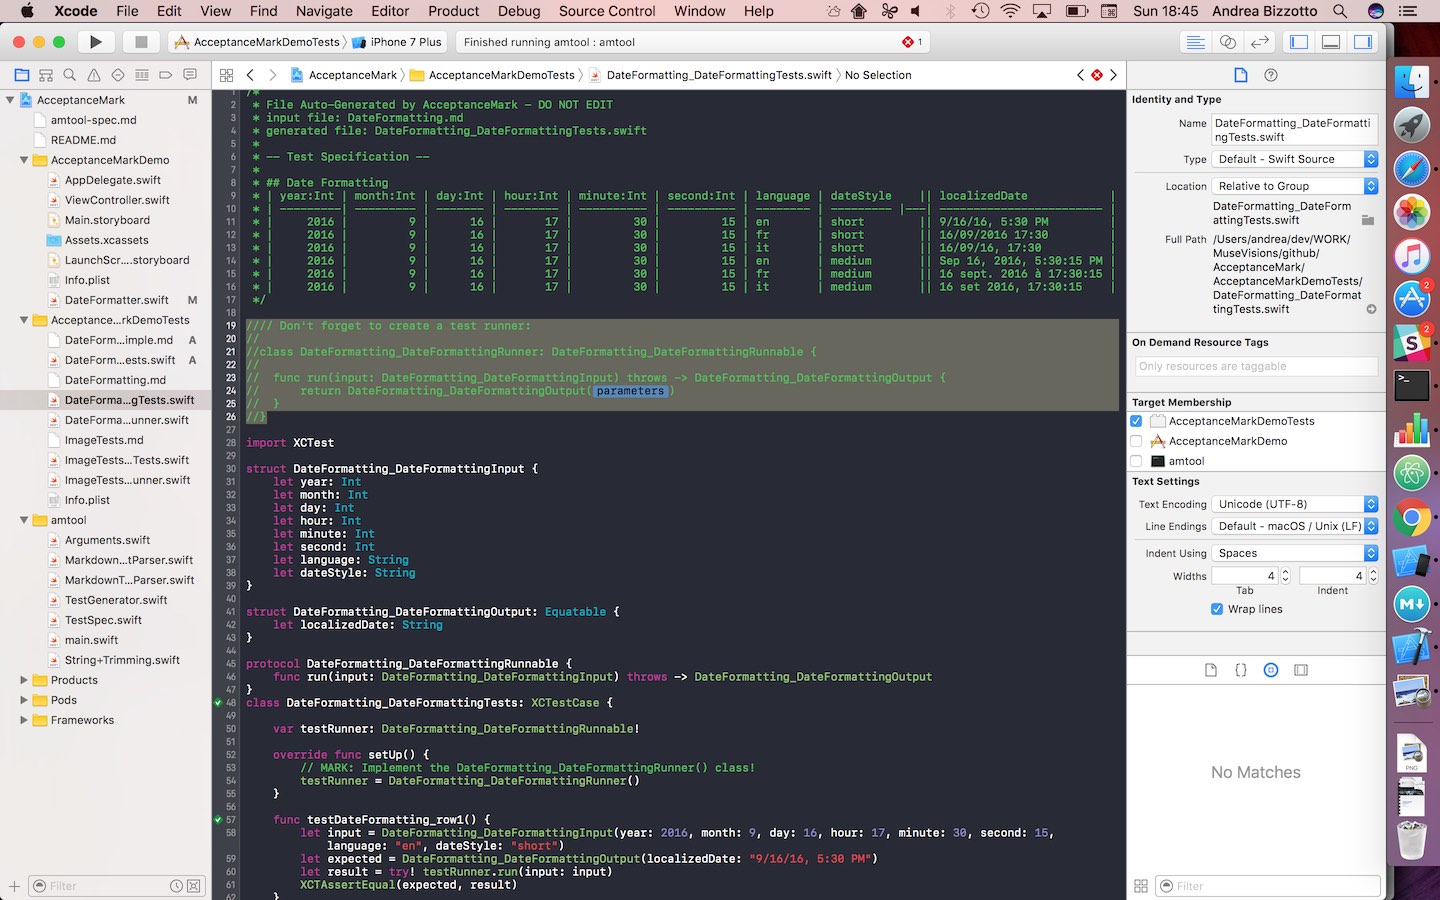
Step 4: Try to compile and run the unit tests. A Swift compiler error is presented: Use of unresolved identifier: 'DateFormatting_DateFormattingRunner' 🤔
This is because the test class is now in the project but a test runner is missing. As I said before, this is required to pass the table inputs to the SUT (the date formatter), and retrieve the outputs (the formatted string) to be compared with the expected values.
Step 5: Create a test runner class.
Notice that AcceptanceMark kindly provides a template for the test runner as part of the generated code in the test class:
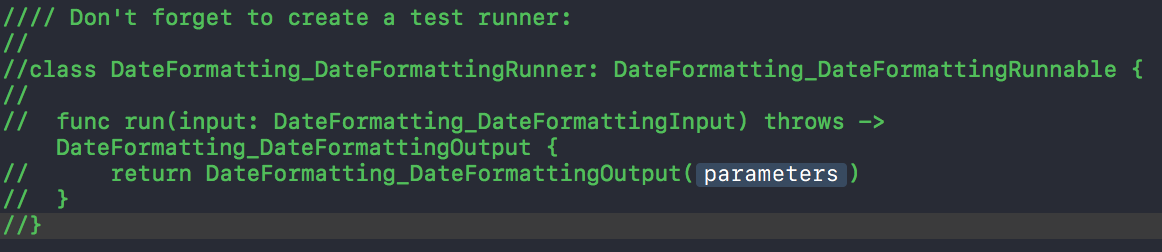
- Add a new Swift file named
DateFormatting_DateFormattingRunner.swiftto the test target. - Paste and uncomment the code from the template in the test class.
Step 6: Implement the test runner.
The inputs of the date formatter are a DateComponents value, a Locale and a DateFormatter.Style.
- Create a
DateComponentsinstance and configure it with the values from the input struct:
var components = DateComponents()
components.year = input.year
components.month = input.month
components.day = input.day
components.hour = input.hour
components.minute = input.minute
components.second = input.second- Calculate the locale directly by using the input language string as an identifier:
let locale = Locale(identifier: input.language)- Calculate the
DateFormatter.Style. This can be done by creating an extension with a custom initialiser that takes a style string and maps it to the desired value:
extension DateFormatter.Style {

    init(styleString: String) {
        switch styleString {
        case "full": self = .full
        case "long": self = .long
        case "medium": self = .medium
        case "short": self = .short
        case "none": self = .none
        default: self = .medium
        }
    }
}
With this, the date style can be calculated directly from the dateStyle value in the input struct:
let style = DateFormatter.Style(styleString: input.dateStyle)- Finally, create a date formatter with the required parameters and use it to calculate the formatted date and return it:
let dateFormatter = DateFormatter(locale: locale, style: style)

let localized = dateFormatter.string(from: components) ?? ""

return DateFormatting_DateFormattingOutput(localizedDate: localized)
The whole implementation of the date formatter test runner class looks like this:
import Foundation

@testable import AcceptanceMarkDemo

extension DateFormatter.Style {

    init(styleString: String) {
        switch styleString {
        case "full": self = .full
        case "long": self = .long
        case "medium": self = .medium
        case "short": self = .short
        case "none": self = .none
        default: self = .medium
        }
    }
}

class DateFormatting_DateFormattingRunner : DateFormatting_DateFormattingRunnable {

    func run(input: DateFormatting_DateFormattingInput) throws -> DateFormatting_DateFormattingOutput {

        var components = DateComponents()
        components.year = input.year
        components.month = input.month
        components.day = input.day
        components.hour = input.hour
        components.minute = input.minute
        components.second = input.second

        let locale = Locale(identifier: input.language)

        let style = DateFormatter.Style(styleString: input.dateStyle)

        let dateFormatter = DateFormatter(locale: locale, style: style)

        let localized = dateFormatter.string(from: components) ?? ""

        return DateFormatting_DateFormattingOutput(localizedDate: localized)
    }
}
Step 7: Compile and run the tests again. This time, all the tests are passing.
Summary
Getting a system under test with AcceptanceMark is simple:
- Write a Markdown table with all the inputs and expected outputs.
- Generate the corresponding Swift test class with
amtool. - Write the test runner (map the inputs / outputs if needed + create the SUT and run it).
This can save a lot of time compared to traditional unit tests, especially if the number of inputs / outputs to test is high. Additional benefits:
- Writing tests becomes partially automated and data-driven.
- Tests are written in a more uniform way across the codebase, and are stateless by design.
- All the business rules are in one place and outside the code, rather than scattered across tests.
As for the test runners, when the inputs or outputs of the SUT are not a basic value type such as String, Float, Int, Bool, some mapping is required to transform them into objects that the SUT can understand.
This can be as simple as creating a Locale object from an input string identifier, or slightly more complex and require to map a set of strings to an enumeration, class or struct by providing an extension with a custom initialiser.
Conclusion
Congratulations for making it to the end! This post has presented a tool to partially automate the process of writing tests for your classes.
Visit the AcceptanceMark GitHub page to find all the source code for this tutorial and further information on how to compile and use amtool.
I hope that you can use AcceptanceMark to save time on your projects as I’m already doing on mine! This is something that I have created just recently and I hope that feedback from the community will help it evolve into an great tool in every developer’s testing toolkit.
If you have any feedback on this tutorial or on how I can improve AcceptanceMark, please let me know in the comments!
If you liked this post, you can share it with your followers or follow me on Twitter!