Xcode 7 introduced a number of improvements in Interface Builder when working with storyboards. Storyboard References, improved Unwind Segues and Segue Subclassing are useful tools that will help building and maintaining complex apps with storyboards. All details on these topics can be found in the What’s New in Storyboards session from WWDC 2015.
One great little feature that was emphasized during this session is the ability to add Offline Views in the scene dock of any view controller. If you ever needed to present a complex view that is shown only after its container view controller is shown, chances are that you’ve used one of two approaches:
- Define the view in a separate xib file and load it, like so:
let myView = NSBundle.mainBundle().loadNibNamed("MyViewNib", owner: self,
                                        options: nil).first! as! UIView
self.view.addSubview(myView)- Define the view as part of the container view controller’s hierarchy, perhaps with alpha = 0 or outside the main view bounds, and then show the view in response to some event.
With the separate xib file approach, we have to load the view programmatically with the code above. If we need to link IBActions and IBOutlets directly to the view controller, we can do so by specifying the view controller class as the File Owner of the xib file. While this works, it requires a couple of configuration steps and it would be a lot nicer if we could just see the view alongside its view controller and have the ability to link IBActions and IBOutlet directly.
All this can be done by adding the view directly to the view controller’s hierarchy in IB, however we can end up stacking multiple views alongside each other, and visually it becomes difficult to work with them as they overlap each other.
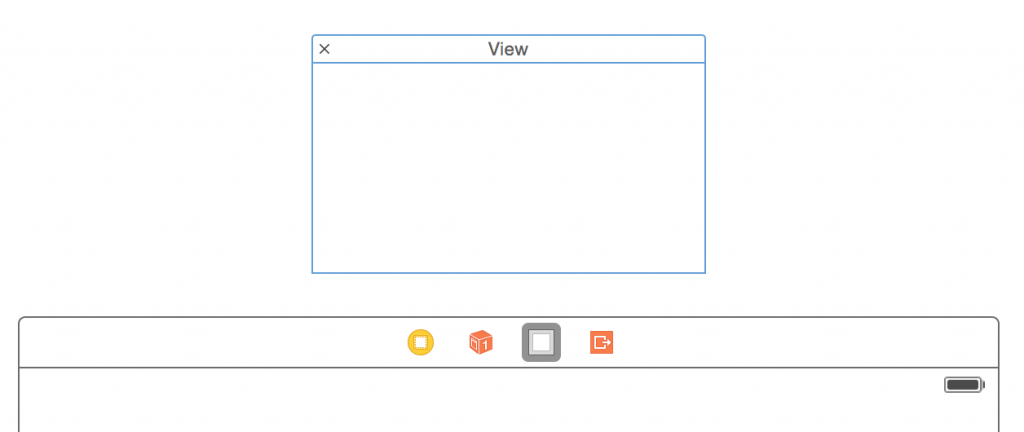
Offline views significantly improve clarity in the storyboard by keeping everything in the same canvas, while showing clearly the view controller and its offline view(s):

To add an offline view to a view controller, simply drag a UIView (or subclass) into the view controller scene dock, and it will appear just above it. Just as easily, multiple offline views can be added and linked to the view controller as needed.
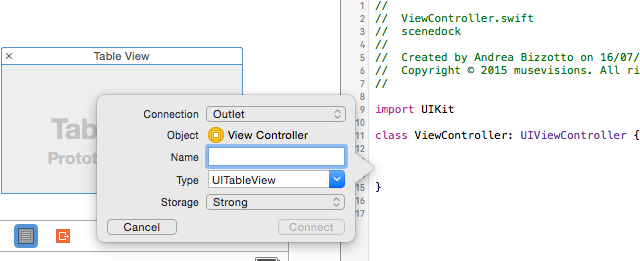
The newly added view can be linked as a IBOutlet by CTRL+dragging it into the View Controller’s source file:

Showing the view
If we compile and run the app, we will see that the view is not visible, even though the debugger reveals that the corresponding IBOutlet is set. This is because offline views are NOT automatically added to the view hierarchy.
To show the view, we need to add it ourselves (for example inside an @IBAction method):
self.view.addSubview(offlineView)If we build and run again, we will see that the view appears in the top-left corner of the main view, and that its size matches the width and height specified in Interface builder.
View sizing
All the above is great - but what if we wanted the offline view to be an overlay that matches the bounds of its superview? As of Xcode 7.0 beta 3 there is no way to tell IB that the offline view should stretch to the container view when added, therefore we need to do this programmatically.
Luckily, our friend Auto Layout comes to help. We can write a simple UIView extension class to constrain all view anchors to its superview edges. See this gist for how this is done.
With this extension, our view can be anchored to the superview’s edges like so:
self.view.addSubview(offlineView) // This is our @IBOutlet
offlineView.anchorAllEdgesToSuperview() // UIView extension method
The vigilant reader will note that translatesAutoresizingMaskIntoConstraints is set to false when adding constraints programmatically. The reason for this is well explained in the Mysteries of Auto Layout, Part 2 session from WWDC 2015.
Conclusion
Offline views are a great addition to Interface Builder, as they make designing UIs easier in Xcode 7. More great features have been added to help us developers work with Storyboards in Interface builder, and the relevant sessions from WWDC cover these in great detail.
If you liked this post, you can share it with your followers or follow me on Twitter!